How To Reset Laptop Bios Password?


Remove Laptop BIOS Or CMOS Password By Reset 


We only use bios password to add up some extra security in our desktop or laptop computers it can also prevent other users to change the bios setting or system booting without any permission.
Just like all our passwords we do forgot one of them and sometimes the forgotten one is be like bios password. In this case most people sending their computer to the IT department or sent back to the manufacture’s service center to break or reset that password and I know it can be expensive because it’s also not covered in the laptop’s warranty. So, doesn’t worry about it ‘cos in this tutorial I’m gonna show you how you can easily remove or break your laptop’s BIOS or CMOS password by just using some backdoor password or removal tricks


This tutorial is intended for experience computer hardware engineer and if you are not one of them or may be a home user then you should have to try it alone, get some assistance from an experience holder person. Otherwise you’ll do it by yourself ’cos I also demonstrate it very well and it’s also not that hard what people are think about it.

Note: Deskdecode is not responsible for the any kind of use or misuse of this material, including loss of data, damage to hardware, or personal injury. Before attempting this tutorial, please take some time and call your laptop customer care support and ask the recommended methods of resetting the bios password, if they won’t help’s you then read this tutorial carefully and try to do it by your own until you’ve fix it.


So Let’s Get Started


There are four different ways what you can use to reset your laptops bios password by taking some different backdoor tricks and here’s the list:
  1. Reset By Backdoor Passwords
  2. Reset By Software
  3. Reset By Bios Jumper And Solder Bread
  4. Reset By C-MOS Battery
So let’s start with the first one and read to the end:

#1 – Reset By Backdoor Password

There are some of backdoor passwords what your laptop’s bios manufacture company makes to open the bios menu in the case of customer forgets their own created password. Here are some passwords according to the Bios Company.

  1. Award BIOS backdoor passwords:
AWARD_SWKDDawardj256
Award SWZBAAACAAWARD_SWJ64
HLTZAAADAAWARD?SWj332
CondoZJAAADCAWARD SWj322
CONCATDjonetAWKWARD01322222
TTPTHAALFAROMEAwkward589589
aPAfALLy01322222589721
  1. AMI BIOS backdoor passwords:
AMIHEWITTLKWPETER
AAAMMMIIIRANDA.M.I.
BIOSAMI?SWCONDO
PASSWORDAMI_SWAMIBIOS
  1. PHOENIX BIOS backdoor passwords:
PhoenixALFAROMEBiosstar
PHOENIXBIOSTARCmos
CMOSBiostarLKWPETER
BIOS1234512345678


  1.  BIOS PASSWORDS BY MANUFACTURER:
SNo.ManufacturerPassword
1.VOBIS & IBMmerlin
2.DellDell
3.BiostarBiostar
4.CompaqCompaq
5.IWilliwill
6.Jetwayspooml
7.SiemensSKY_FOX
8.ToshibaTOSHIBA BIOS
9.IBMAPTIVA BIOS


#2 – Resting By Password Cracking Software

We can also remove the bios password by using the cracking software’s like “Hirens BootCD 15.2”. The best part about this Hirens Boot CD is its bootable software which contains numbers of diagnostic tools and a live operating system also.
Download link >>>>>link
Download the Hirens boot cd and make a bootable usb pendrive of “Hirens BootCD”. If you don’t know how to boot a pendrive then here’s our another tutorial to show you how to do that:
>>>How To Make A Bootable Usb Pen Drive?
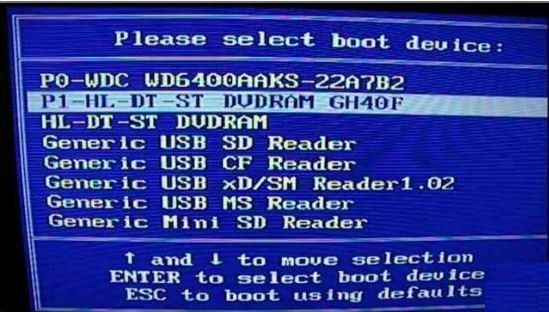
Step 1 – Boot the “Hirens BootCD”
Open the boot menu of your computer by pressing F9, F10, F11, F12 whatever your motherboard support’s and Select the Usb drive or DVD-RW to Boot Up your bootable device what you’ve made recently.
>>How to Quick Boot A USB or CD/DVD Directly From the Boot Menu?


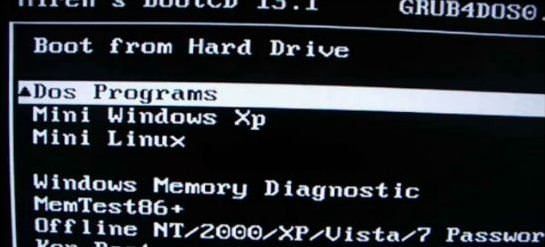
Step 2 – Select The Dos Programs.
After booting the cd you will see the Hirens boot cd menu like this and now you’ll just need to select the Dos Programs


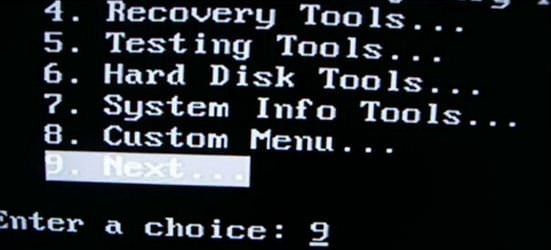
Step 3 – Select The “Next…” On The 9th No.
Select Next and do it again and again until you’ve find the “BIOS/CMOS tools”, after that open it.


Step 4 – Select the Bios Cracker 5.0 tool in the BIOS/CMOS tools.


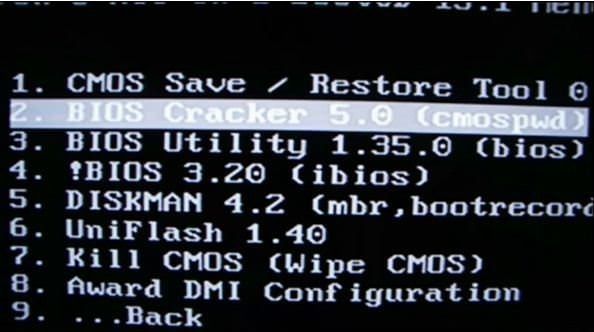
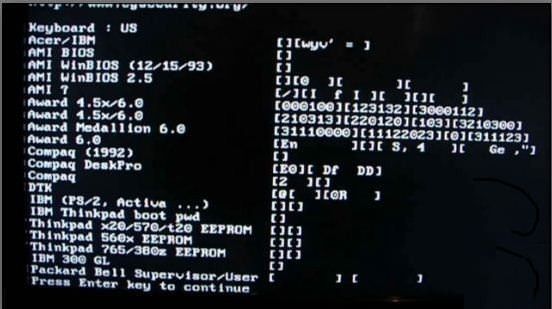
After selecting the “Bios Cracker 5.0 (cmospwd)” your screen got fluctuate and you’ll see some software gets to auto start and ask you some of questions like language or something, you’ll just have to click enter and that’s it. After some of questions you will see, the program asks you to “Press enter key to continue”. Just press the enter key and your laptop bios password gets reset.


Restart your computer and check the password is removes or not, if the password is still remains try ours another solution listed below.


#3 – Resting By Bios Jumper And Solder Bread

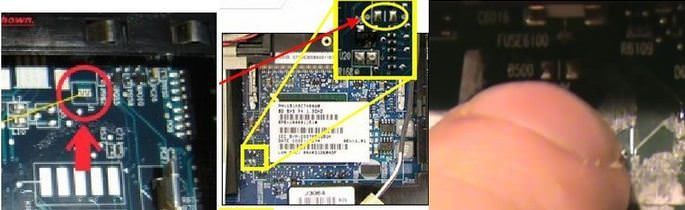
You can also break the bios by shorting the CMOS jumper which you’ll find on the motherboard of your laptop. Shorting the jumper for 20 second can reset your bios password. Mostly the bios jumper (solder bread) located, nearest by the ram slot or the CMOS battery.
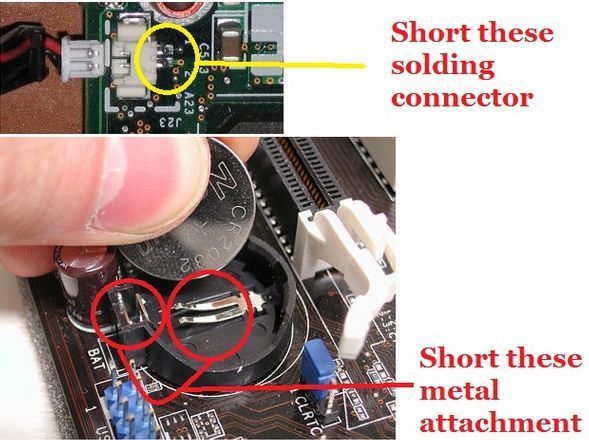
The CMOS jumper is looks like this:


Step 1 – Open your laptops back cover or ram case cover.
Step 2 – Find the jumper.
Step 3 – Short the jumper by some small piece of wire for 20 sec.


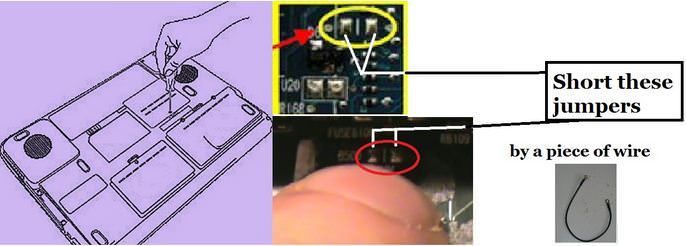
After shorting the password has been cleared. If that works, screw back the cover and load the default setting in the bios to make it as on original position. If the password is still remains try another solution listed below.

#4 – Resting by C-MOS battery

All the CMOS and bios setting is saved in the bios chip which was attached on the motherboard and the main work of CMOS battery is to giving continuous power supply to the bios chip to save all the settings on it. If you unplug or remove the battery for above 5 sec it will turn off your bios and by turning the bios off the setting will be reset.
Step 1 – Unplug all the power supply which is connected to the laptop like “Laptop’s Battery” or “Power Adaptor”.
Step 2 – Disassemble your laptop and find the CMOS battery which was attached to the laptop’s motherboard. Watch the laptop disassembly video on internet to know where your laptop’s CMOS battery was located; sometimes it was on behind the case of ram.


Note – If you don’t know how to disassemble your laptop then watch a disassemble video of your laptop on YouTube or some other helping website


Step 3 – After finding the battery, just disconnect it or remove the battery for 5 sec


Step 4 – Short the CMOS battery connector by the use of some metal wire because in some case the motherboard’s manufacturers make a backup power supply to the Bios Chipset by using of some capacitor. So, that’s why we short them to clear the remains power supply in the motherboard.


Step 5 – Reinstall the CMOS battery and assemble back your laptop and that’s it. Now just Power ON your laptop and the bios password is gone.
Note – Sometimes this solution doesn’t work. In that case you’ll have to flash or reinstall your bios software or maybe replacing the bios chip. 

That's it try at own risk.......post by Pawan kumar


Login  Area  

                                                            Login  Area


                         User Id              

                       Password        

How to see to current password of any windows

How to see to current password of any windows

Ophcrack is a free Windows password cracker based on Slitaz linux and using ophcrack with modified 'rainbow tables'. It comes with a Graphical User Interface and runs on multiple platforms. Once you have made the bootable USB flash drive, just boot from it and ophcrack will automatically run and display a nice table of all your Windows users and their passwords (if set and if crackable). Slitaz runs entirely in RAM and does not change any files on your target computer (i.e. non-invasive).


Introduction

There are two versions of ISO file for Ophcrack, one for Vista/Win 7 and one for XP - they are essentially the same but contain different rainbow hash tables. This tutorial describes how to prepare a bootable USB drive using the ISO files of these two Ophcrack Live CDs and combine them. When the linux OS boots, it looks for the rainbow tables (table0.bin, etc.) in the \tables folder on all mounted volumes. For this reason the \tables folder from inside each ISO file must be extracted to the USB drive. This means that over 800Mb of files are in the \tables folder and also in the iso files. For this reason, although it is perfectly possible to boot from the ISO files via grub4dos, this tutorial uses the contents of the ISO files to save space on your USB drive as the /tables folder must be in the root of an accessible drive anyway (but see Tutorial 93 for a way to use just the ISO files).

See how easy it is to crack your own PC - maybe you will start using stronger passwords now


Method

The following instructions assumes you know your way around extracting the contents of ISO files, etc. A bootable USB hard disk will load and run ophcrack faster than a slow USB Flash drive...
  1. For version 3.4.0 download the 46MB without tables liveCD ISO from here and then download the separate free tables for Vista and XP from the Tables tab on the website and unzip them. Make sure you check that the size of the ISO file is correct after downloading and check the MD5 hash is correct (tip: use RMPrepUSB CTRL.C to check the MD5 value).

    IMPORTANT: if the folders and files under \tables will appear as all uppercase (e.g. 3.4.0 has \TABLES\XP_FREE_\TABLE0.BIN, etc.) if you use an iso mount utility like imdisk or clonedrive, you must change them all to lowercase filenames (e.g. table0.bin). This must be done for the \tables folder and ALL files under the \tables folder - otherwise Ophcrack will not find the tables! For this reason I suggest you use 7zip to extract files from an iso OR download the ophcrack-notables-livecd-3.4.0.iso and then download the XP and Vista free tables zip files (see Tables tab on website) - the tables in the zip files have all lowercase names but the files in the full LiveCD ISOs are all uppercase if you mount the iso as a volume and so will not work. Always use 7zip or check that you have lower case filenames.
  2. Using WinImage or 7Zip, extract the contents of the ISO. Unzip the free table zip files to folders on your system hard disk as follows:

    C:\ophcrack\ophcrack\boot            - copy \boot folder from ISO (only the bzimage and rootfs.gz files are needed)
    C:\ophcrack\tables\xp_free_small  - copy \tables\xp_free_small from XP free tables zip file
    C:\ophcrack\tables\vista_free
             - copy \tables\vista_free from Vista free tables zip file
  3. Create a file in C:\ophcrack called menu.lst using Notepad  (press F4 in RMPrepUSB) with the following contents:

title OphCrack Password Cracker LOWRAM (lowram - slower on Vista/Win7 systems) 
find --set-root /ophcrack/boot/bzImage 
kernel /ophcrack/boot/bzImage rw root=/dev/null vga=normal kmap=uk  ophcrack=lowram  screen=1024x768x16 autologin
initrd /ophcrack/boot/rootfs.gz 

title OphCrack Password Cracker FAST (for more than 512MB RAM systems)
find --set-root /ophcrack/boot/bzImage 
kernel /ophcrack/boot/bzImage rw root=/dev/null vga=normal kmap=uk                               screen=1024x768x16 autologin
initrd /ophcrack/boot/rootfs.gz 


  1. you can change kmap=uk to us or de or whatever (though you should not need a keyboard). The login password is 'root' (if required).
  2. Run RMPrepUSB and use the following settings on a 1GB or larger USB Flash drive or USB HDD:

    1. MAX, 2=OphCrack, 3=MSDOS, 4=FAT32+HDD, 5=C:\ophcrack + tick Copy Files  --> then click 6 Prepare Drive


  1. Click on Install grub4dos and if prompted use No=PBR. Then hit[ Enter] to copy grldr when prompted (note: do NOT click on the Windows shell close icon, you must press Enter or the grldr file will not be copied).

    Check you now have a USB drive with this contents:

    \ophcrack folder
    \tables folder             NOTE: This should contain a folder which contains the tables - e.g. \tables\xp_free_small\table0.bin, \tables\vista_free_\table0.bin
    \grldr  file
    \menu.lst file
  2. Click on Eject Drive in RMPrepUSB (or use the SystemTray icon).
Now go try it! If you are cracking an XP system, the Vista free tables are not needed - you can move them to another folder temporarily or stop Ophcrack once it starts and deselect the vista table

Search This Blog

Kategori

Kategori