
How To Reset Laptop Bios Password?

Remove Laptop BIOS Or CMOS Password By Reset
We only use bios password to add up some extra security in our desktop or laptop computers it can also prevent other users to change the bios setting or system booting without any permission.
Just like all our passwords we do forgot one of them and sometimes the forgotten one is be like bios password. In this case most people sending their computer to the IT department or sent back to the manufacture’s service center to break or reset that password and I know it can be expensive because it’s also not covered in the laptop’s warranty. So, doesn’t worry about it ‘cos in this tutorial I’m gonna show you how you can easily remove or break your laptop’s BIOS or CMOS password by just using some backdoor password or removal tricks
This tutorial is intended for experience computer hardware engineer and if you are not one of them or may be a home user then you should have to try it alone, get some assistance from an experience holder person. Otherwise you’ll do it by yourself ’cos I also demonstrate it very well and it’s also not that hard what people are think about it.
Note: Deskdecode is not responsible for the any kind of use or misuse of this material, including loss of data, damage to hardware, or personal injury. Before attempting this tutorial, please take some time and call your laptop customer care support and ask the recommended methods of resetting the bios password, if they won’t help’s you then read this tutorial carefully and try to do it by your own until you’ve fix it.
So Let’s Get Started
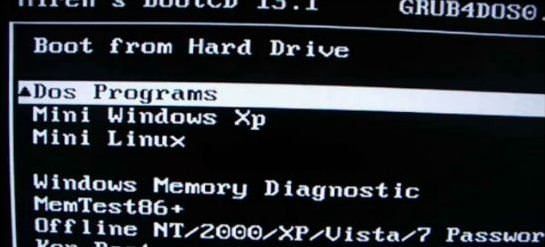
There are four different ways what you can use to reset your laptops bios password by taking some different backdoor tricks and here’s the list:
- Reset By Backdoor Passwords
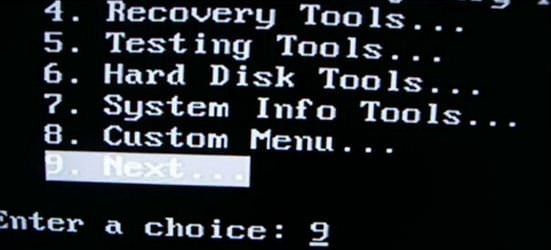
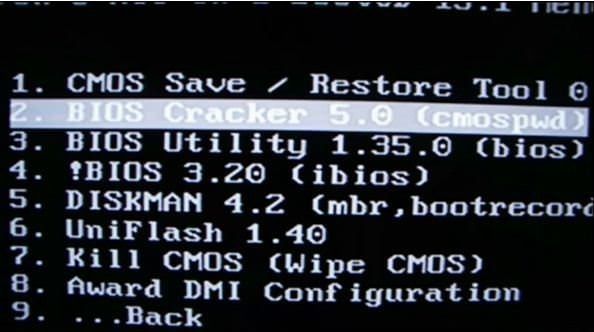
- Reset By Software
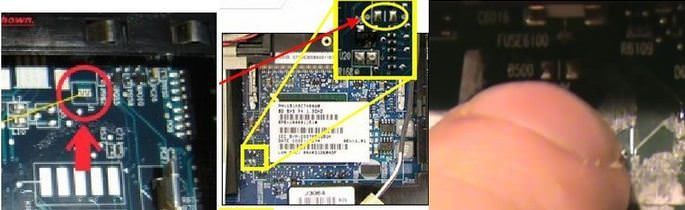
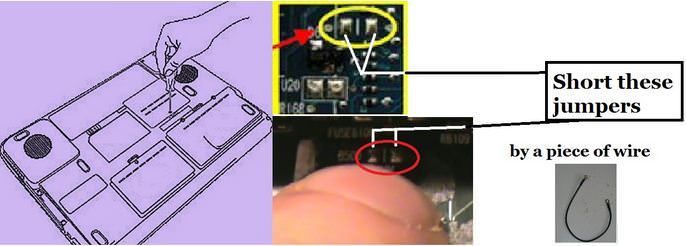
- Reset By Bios Jumper And Solder Bread
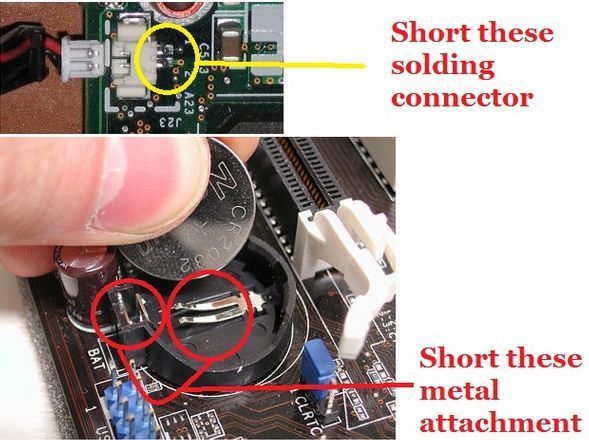
- Reset By C-MOS Battery
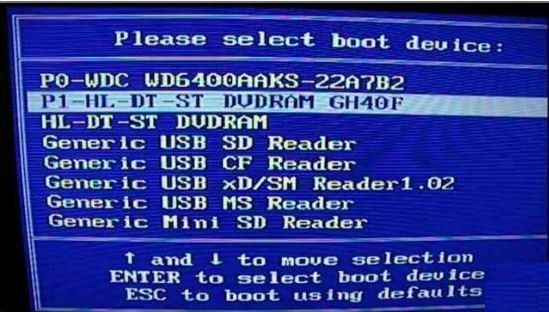
#1 – Reset By Backdoor Password
There are some of backdoor passwords what your laptop’s bios manufacture company makes to open the bios menu in the case of customer forgets their own created password. Here are some passwords according to the Bios Company.
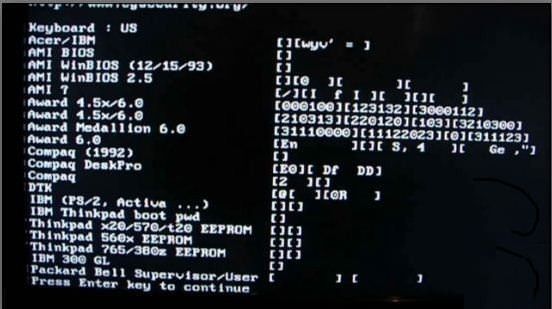
- Award BIOS backdoor passwords:
| AWARD_SW | KDD | award | j256 |
| Award SW | ZBAAACA | AWARD_SW | J64 |
| HLT | ZAAADA | AWARD?SW | j332 |
| Condo | ZJAAADC | AWARD SW | j322 |
| CONCAT | Djonet | AWKWARD | 01322222 |
| TTPTHA | ALFAROME | Awkward | 589589 |
| aPAf | ALLy | 01322222 | 589721 |
- AMI BIOS backdoor passwords:
| AMI | HEWITT | LKWPETER |
| AAAMMMIII | RAND | A.M.I. |
| BIOS | AMI?SW | CONDO |
| PASSWORD | AMI_SW | AMIBIOS |
- PHOENIX BIOS backdoor passwords:
|

Login Area
User Id
Password

How to see to current password of any windows
Ophcrack is a free Windows password cracker based on Slitaz linux and using ophcrack with modified 'rainbow tables'. It comes with a Graphical User Interface and runs on multiple platforms. Once you have made the bootable USB flash drive, just boot from it and ophcrack will automatically run and display a nice table of all your Windows users and their passwords (if set and if crackable). Slitaz runs entirely in RAM and does not change any files on your target computer (i.e. non-invasive).
Introduction
There are two versions of ISO file for Ophcrack, one for Vista/Win 7 and one for XP - they are essentially the same but contain different rainbow hash tables. This tutorial describes how to prepare a bootable USB drive using the ISO files of these two Ophcrack Live CDs and combine them. When the linux OS boots, it looks for the rainbow tables (table0.bin, etc.) in the \tables folder on all mounted volumes. For this reason the \tables folder from inside each ISO file must be extracted to the USB drive. This means that over 800Mb of files are in the \tables folder and also in the iso files. For this reason, although it is perfectly possible to boot from the ISO files via grub4dos, this tutorial uses the contents of the ISO files to save space on your USB drive as the /tables folder must be in the root of an accessible drive anyway (but see Tutorial 93 for a way to use just the ISO files).
See how easy it is to crack your own PC - maybe you will start using stronger passwords now
Method
The following instructions assumes you know your way around extracting the contents of ISO files, etc. A bootable USB hard disk will load and run ophcrack faster than a slow USB Flash drive...
- For version 3.4.0 download the 46MB without tables liveCD ISO from here and then download the separate free tables for Vista and XP from the Tables tab on the website and unzip them. Make sure you check that the size of the ISO file is correct after downloading and check the MD5 hash is correct (tip: use RMPrepUSB CTRL.C to check the MD5 value).
IMPORTANT: if the folders and files under \tables will appear as all uppercase (e.g. 3.4.0 has \TABLES\XP_FREE_\TABLE0.BIN, etc.) if you use an iso mount utility like imdisk or clonedrive, you must change them all to lowercase filenames (e.g. table0.bin). This must be done for the \tables folder and ALL files under the \tables folder - otherwise Ophcrack will not find the tables! For this reason I suggest you use 7zip to extract files from an iso OR download the ophcrack-notables-livecd-3.4.0.iso and then download the XP and Vista free tables zip files (see Tables tab on website) - the tables in the zip files have all lowercase names but the files in the full LiveCD ISOs are all uppercase if you mount the iso as a volume and so will not work. Always use 7zip or check that you have lower case filenames. - Using WinImage or 7Zip, extract the contents of the ISO. Unzip the free table zip files to folders on your system hard disk as follows:
C:\ophcrack\ophcrack\boot - copy \boot folder from ISO (only the bzimage and rootfs.gz files are needed)
C:\ophcrack\tables\xp_free_small - copy \tables\xp_free_small from XP free tables zip file
C:\ophcrack\tables\vista_free - copy \tables\vista_free from Vista free tables zip file - Create a file in C:\ophcrack called menu.lst using Notepad (press F4 in RMPrepUSB) with the following contents:
title OphCrack Password Cracker LOWRAM (lowram - slower on Vista/Win7 systems)
find --set-root /ophcrack/boot/bzImage
kernel /ophcrack/boot/bzImage rw root=/dev/null vga=normal kmap=uk ophcrack=lowram screen=1024x768x16 autologin
initrd /ophcrack/boot/rootfs.gz
title OphCrack Password Cracker FAST (for more than 512MB RAM systems)
find --set-root /ophcrack/boot/bzImage
kernel /ophcrack/boot/bzImage rw root=/dev/null vga=normal kmap=uk screen=1024x768x16 autologin
initrd /ophcrack/boot/rootfs.gz
- you can change kmap=uk to us or de or whatever (though you should not need a keyboard). The login password is 'root' (if required).
- Run RMPrepUSB and use the following settings on a 1GB or larger USB Flash drive or USB HDD:
1. MAX, 2=OphCrack, 3=MSDOS, 4=FAT32+HDD, 5=C:\ophcrack + tick Copy Files --> then click 6 Prepare Drive
- Click on Install grub4dos and if prompted use No=PBR. Then hit[ Enter] to copy grldr when prompted (note: do NOT click on the Windows shell close icon, you must press Enter or the grldr file will not be copied).
Check you now have a USB drive with this contents:
\ophcrack folder
\tables folder NOTE: This should contain a folder which contains the tables - e.g. \tables\xp_free_small\table0.bin, \tables\vista_free_\table0.bin
\grldr file
\menu.lst file - Click on Eject Drive in RMPrepUSB (or use the SystemTray icon).
Now go try it! If you are cracking an XP system, the Vista free tables are not needed - you can move them to another folder temporarily or stop Ophcrack once it starts and deselect the vista table
How To Hack WPA/WPA2 Wi-Fi With Kali Linux & Aircrack-ng

Kali Linux can be used for many things, but it probably is best known for its ability to penetration test, or “hack,” WPA and WPA2 networks. There are hundreds of Windows applications that claim they can hack WPA; don’t get them! They’re just scams, used by professional hackers, to lure newbie or wannabe hackers into getting hacked themselves. There is only one way that hackers get into your network, and that is with a Linux-based OS, a wireless card capable of monitor mode, and aircrack-ng or similar. Also note that, even with these tools, Wi-Fi cracking is not for beginners. Playing with it requires basic knowledge of how WPA authentication works, and moderate familiarity with Kali Linux and its tools, so any hacker who gains access to your network probably is no beginner!
These are things that you’ll need:
- A successful install of Kali LinuX
- A wireless adapter capable of injection/monitor mode, here is a list of the best: http://blackmoreops.com/recommended-usb-wireless-cards-kali-linux
- A wordlist to try and “crack” the handshake password once it has been captured
- Time and patients
If you have these then roll up your sleeves and let’s see how secure your network is!
Important notice: Hacking into anyone’s Wi-Fi without permission is considered an illegal act or crime in most countries. We are performing this tutorial for the sake of penetration testing, hacking to become more secure, and are using our own test network and router.
Step One:

Step Two:
Step Three:
Disconnect from all wireless networks, open a Terminal, and type airmon-ng
![[Step-33.png]](http://lh3.googleusercontent.com/-9k18vyy7ZR8/U4uK_l08t_I/AAAAAAAAA4g/z3XPgWEM7Vw/s320/Step-33.png) |
| Add caption |
This will list all of the wireless cards that support monitor (not injection) mode. If no cards are listed, try disconnecting and reconnecting the card and check that it supports monitor mode. You can check if the card supports monitor mode by typing ifconfig in another terminal, if the card is listed in ifconfig, but doesn’t show up in airmon-ng, then the card doesn’t support it.
You can see here that my card supports monitor mode and that it’s listed as wlan0.
Step Four:
Type airmon-ng start followed by the interface of your wireless card. mine is wlan0, so my command would be: airmon-ng start wlan0

EDIT:A bug recently discovered in Kali Linux makes airmon-ng set the channel as a fixed “-1” when you first enable mon0. If you receive this error, or simply do not want to take the chance, follow these steps after enabling mon0:
Type: ifconfig [interface of wireless card] down and hit Enter.
Replace [interface of wireless card] with the name of the interface that you enabled mon0 on; probably called wlan0. This disables the wireless card from connecting to the internet, allowing it to focus on monitor mode instead.
After you have disabled mon0 (completed the wireless section of the tutorial), you’ll need to enable wlan0 (or name of wireless interface), by typing: ifconfig [interface of wireless card] up and pressing Enter.
Step Five: Type airodump-ng followed by the name of the new monitor interface, which is probably mon0.

If you receive a “fixed channel –1” error, see the Edit above.
Step Six:
Airodump will now list all of the wireless networks in your area, and lots of useful information about them. Locate your network or the network that you have permission to penetration test. Once you’ve spotted your network on the ever-populating list, hit Ctrl + C on your keyboard to stop the process. Note the channel of your target network

Step Seven:
Copy the BSSID of the target network

Now type this command:
airodump-ng -c [channel] --bssid [bssid] -w /root/Desktop/ [monitor interface]Replace [channel] with the channel of your target network. Paste the network BSSID where [bssid] is, and replace [monitor interface] with the name of your monitor-enabled interface, (mon0).
A complete command should look like this:
airodump-ng -c 10 --bssid 00:14:BF:E0:E8:D5 -w /root/Desktop/ mon0
Now press enter.
Step Eight:
Airodump with now monitor only the target network, allowing us to capture more specific information about it. What we’re really doing now is waiting for a device to connect or reconnect to the network, forcing the router to send out the four-way handshake that we need to capture in order to crack the password.
Also, four files should show up on your desktop, this is where the handshake will be saved when captured, so don’t delete them!
But we’re not really going to wait for a device to connect, no, that’s not what impatient hackers do. We’re actually going to use another cool-tool that belongs to the aircrack suite called aireplay-ng, to speed up the process. Instead of waiting for a device to connect, hackers use this tool to force a device to reconnect by sending deauthentication (deauth) packets to the device, making it think that it has to reconnect with the router.
Of course, in order for this tool to work, there has to be someone else connected to the network first, so watch the airodump-ng and wait for a client to show up. It might take a long time, or it might only take a second before the first one shows. If none show up after a lengthy wait, then the network might be empty right now, or you’re to far away from the network.
You can see in this picture, that a client has appeared on our network, allowing us to start the next step.

Step Nine:
leave airodump-ng running and open a second terminal. In this terminal, type this command:
aireplay-ng –0 2 –a [router bssid] –c [client bssid] mon0The –0 is a short cut for the deauth mode and the 2 is the number of deauth packets to send.
-a indicates the access point (router)’s bssid, replace [router bssid] with the BSSID of the target network, which in my case, is 00:14:BF:E0:E8:D5.
-c indicates the clients BSSID, noted in the previous picture. Replace the [client bssid] with the BSSID of the connected client, this will be listed under “STATION.”
And of course, mon0 merely means the monitor interface, change it if yours is different.
My complete command looks like this:
aireplay-ng –0 2 –a 00:14:BF:E0:E8:D5 –c 4C:EB:42:59:DE:31 mon0

Step Ten:
Upon hitting Enter, you’ll see aireplay-ng send the packets, and within moments, you should see this message appear on the airodump-ng screen!


Step 11:
This concludes the external part of this tutorial. From now on, the process is entirely between your computer, and those four files on your Desktop. Actually, the .cap one, that is important. Open a new Terminal, and type in this command:
aircrack-ng -a2 -b [router bssid] -w [path to wordlist] /root/Desktop/*.cap
-a is the method aircrack will use to crack the handshake, 2=WPA method.
-b stands for bssid, replace [router bssid] with the BSSID of the target router, mine is 00:14:BF:E0:E8:D5.
-w stands for wordlist, replace [path to wordlist] with the path to a wordlist that you have downloaded. I have a wordlist called “wpa.txt” in the root folder.
/root/Desktop/*.cap is the path to the .cap file containing the password, the * means wild card in Linux, and since I’m assuming that there are no other .cap files on your Desktop, this should work fine the way it is.
My complete command looks like this:
aircrack-ng –a2 –b 00:14:BF:E0:E8:D5 –w /root/wpa.txt /root/Desktop/*.cap
Now press Enter.
Step 12:
Aircrack-ng will now launch into the process of cracking the password. However, it will only crack it if the password happens to be in the wordlist that you’ve selected. Sometimes, it’s not. If this is the case, then you can congratulate the owner on being “Impenetrable,” of course, only after you’ve tried every wordlist that a hacker might use or make!
Cracking the password might take a long time depending on the size of the wordlist. Mine went very quickly.
If the phrase is in the wordlist, then aircrack-ng will show it too you like this:

The passphrase to our test-network was “notsecure,” and you can see here that aircrack found it.
If you find the password without a decent struggle, then change your password, if it’s your network. If you’re penetration testing for someone, then tell them to change their password as soon as possible.
Please use this information only in legal ways-
Post by- PAWAN KUMAR
How to Crack Wi-Fi Passwords—For Beginners
Various
wireless security protocols were developed to protect home wireless
networks. These wireless security protocols include WEP, WPA, and WPA2,
each with their own strengths — and weaknesses. In addition to
preventing uninvited guests from connecting to your wireless network,
wireless security protocols encrypt your private data as it is being
transmitted over the airwaves.
Following are descriptions of the WEP, WPA, and WPA2 wireless security protocols:
Wireless networks are inherently insecure. In the
early days of wireless networking, manufacturers tried to make it as
easy as possible for end users. The out-of-the-box configuration for
most wireless networking equipment provided easy (but insecure) access
to a wireless network.
Although many of these issues have since been addressed, wireless
networks are generally not as secure as wired networks. Wired networks,
at their most basic level, send data between two points, A and B, which
are connected by a network cable. Wireless networks, on the other hand,
broadcast data in every direction to every device that happens to be
listening, within a limited range.Following are descriptions of the WEP, WPA, and WPA2 wireless security protocols:
- Wired Equivalent Privacy (WEP): The original encryption protocol developed for wireless networks. As its name implies, WEP was designed to provide the same level of security as wired networks. However, WEP has many well-known security flaws, is difficult to configure, and is easily broken.
- Wi-Fi Protected Access (WPA): Introduced as an interim security enhancement over WEP while the 802.11i wireless security standard was being developed. Most current WPA implementations use a preshared key (PSK), commonly referred to as WPA Personal, and the Temporal Key Integrity Protocol (TKIP, pronounced tee-kip) for encryption. WPA Enterprise uses an authentication server to generate keys or certificates.
- Wi-Fi Protected Access version 2 (WPA2): Based on the 802.11i wireless security standard, which was finalized in 2004. The most significant enhancement to WPA2 over WPA is the use of the Advanced Encryption Standard (AES) for encryption. The security provided by AES is sufficient (and approved) for use by the U.S. government to encrypt information classified as top secret — it’s probably good enough to protect your secrets as well!
Table of Contents
- How are wireless networks secured?
- What you'll need
- Setting up CommView for Wi-Fi
- Selecting the target network and capturing packets
- Waiting...
- Now the interesting part... CRACKING!
- Are you a visual learner?
Step 1: How Are Wireless Networks Secured?
In a secured wireless connection, internet data is sent in the form of encrypted packets. These packets are encrypted with network security keys. If you somehow manage to get hold of the key for a particular wireless network you virtually have access to the wireless internet connection.Broadly speaking, there are two main types of encryptions used.
Step 2: What You'll Need
- A compatible wireless adapter:
- CommView for Wi-Fi:
After capturing the packets this software does the actual cracking. Click here to download the software from their website.
- A little patience is vital.
Step 3: Setting Up CommView for Wi-Fi
- Download the zip file of CommView for Wi-Fi from the website. Extract the file and run setup.exe to install CommView for Wi-Fi. When CommView opens for the first time it has a driver installation guide. Follow the prompts to install the driver for your wireless card.
- Run CommView for Wi-Fi.
- Click the play icon on the top left of the application window.
CommView now starts scanning for wireless networks channel by channel. After a few minutes you will have a long list of wireless networks with their security type and signal. Now it is time to choose your target network.
Step 4: Selecting the Target Network and Capturing Packets
A few things to keep in mind before choosing the target wireless network:- This tutorial is only for WEP encrypted networks, so make sure you select a network with WEP next to its name. If you need to crack a WPA encrypted network, follow this tutorial instead.
- Choose a network with the highest signal.
- Each network will have its details in the right column.
- Make sure the WEP network you are choosing has the lowest dB (decibel) value.
Now you might notice that packets are being captured from all the networks in the particular channel. To capture packets only from the desired network follow the given steps.
- Right click the desired network and click on copy MAC Address.
- Switch to the Rules tab on the top.
- On the left hand side choose MAC Addresses.
- Enable MAC Address rules.
- For 'Action' select 'capture' and for 'Add record' select 'both'.
- Now paste the mac address copied earlier in the box below.
Now you have to save the packets so that they can be cracked later. To do this:
- Go to the logging tab on top and enable auto saving.
- Set Maximum Directory Size to 2000.
- Set Average Log File Size to 20.
Step 5: Waiting...
Now the boring part- WAITING!NOTE: The amount of time taken to capture enough data packets depends on the signal and the networks usage. The minimum number of packets you should capture should be 100,000 for a decent signal.
After you think you have enough packets (at least 100,000 packets), you'll need to export them.
- Go to the log tab and click on concatenate logs.
- Select all the logs that have been saved.
- Do not close CommView for Wi-Fi.
- Now navigate to the folder where the concatenated logs have been saved.
- Open the log file.
- Select File- Export -Wire shark tcpdump format and choose any suitable destination.
- This will save the logs with a .cap extension to that location.
Step 6: Now the Interesting Part... CRACKING!
- Download Aircrack-ng and extract the zip file.
- Open the folder and navigate to 'bin'.
- Run Aircrack-ng GUI.
- Choose WEP.
- Open your .cap file that you had saved earlier.
- Click Launch.
- In the command prompt type in the index number of your target wireless network.
- Wait for a while. If everything goes fine, the wireless key will be shown.
BEST OF LUCK!....this trick is shared by Pawan kumar
Subscribe to:
Comments (Atom)